677 Messages
•
44.6K Points
Sitebuilder Plus: Prevent Tiling for Background Image

Any image you import and set as a "background" image will tile, or repeat continuously depending on how large the viewer sizes their web browser. If you wish to prevent the tile effect. You will just set the background to a solid color, then import the background image as a regular image, instead of background image. If you already have other elements on the page, you will also need to layer the image so that it is behind the other elements.
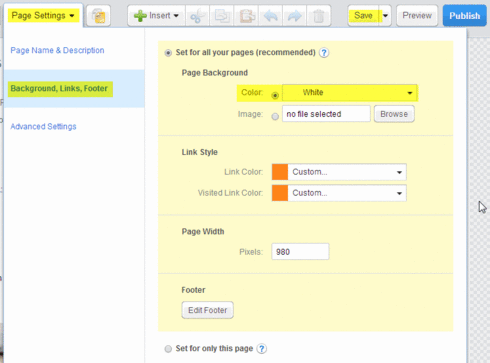
1. Change Background to solid color, by clicking Page Settings > Background, Links, Footer and select a color from the drop-down, and then the Save button.

2. Next import the new image by clicking Insert > Image.

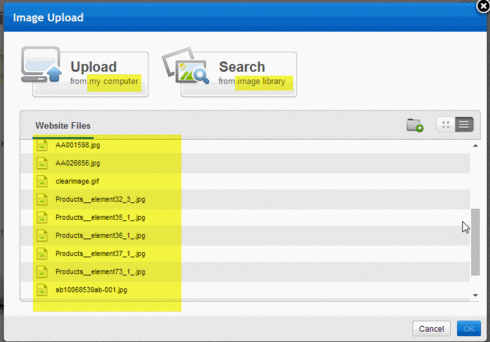
3. You'll be given options to import from your computer, the image library, or you can select another image already in the file manager.

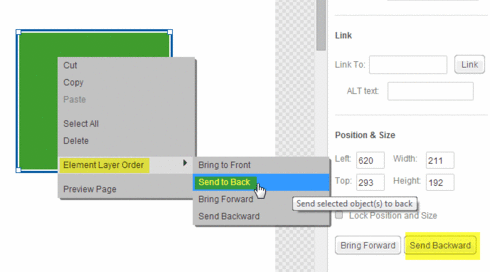
4. The final step is to size, and position the image in the desired location. If it's covering other elements on the page, you will need to layer it to the back. This is easiest done by "right-clicking" on the image, then choosing Element layer order > Send to Back. You can also click the Send Backward button multiple times until it's layered to the back.
1. Change Background to solid color, by clicking Page Settings > Background, Links, Footer and select a color from the drop-down, and then the Save button.
2. Next import the new image by clicking Insert > Image.
3. You'll be given options to import from your computer, the image library, or you can select another image already in the file manager.
4. The final step is to size, and position the image in the desired location. If it's covering other elements on the page, you will need to layer it to the back. This is easiest done by "right-clicking" on the image, then choosing Element layer order > Send to Back. You can also click the Send Backward button multiple times until it's layered to the back.


rcdj119044
2 Messages
•
148 Points
6 years ago
0
0