677 Messages
•
44.6K Points
WebsiteBuilder: Contact Form Email Address
Setting up a contact form to your page is one of, if not, THE MOST essential pieces to building a website next to having a phone number or a street address listed.
Maybe you just upgraded your email to a domain-specific address and you'd like to change that on your contact form? Perfect, you're in the right place! Giving visitors an updated and accurate way to reach you means you're more likely to get the results you set out for! In this article, we will learn how to change your contact form email quickly and simply.
To begin,You will want to log into your Websitebuilder and navigate to the page that contains your contact form.
Pro Tip: If you are updating multiple forms with different fields, you will have to run through these steps separately for each form.
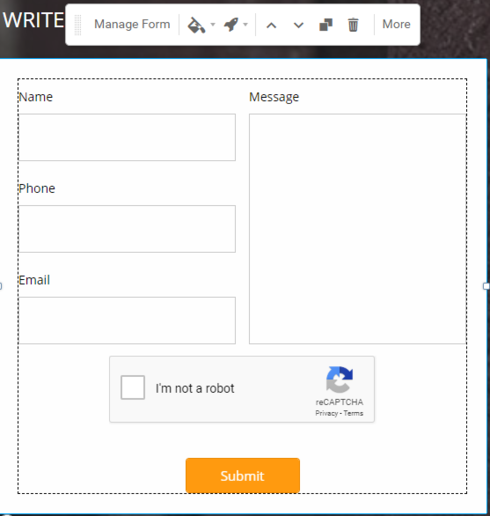
1) Physically click on the form to see its settings tool-bar appear directly above the form.
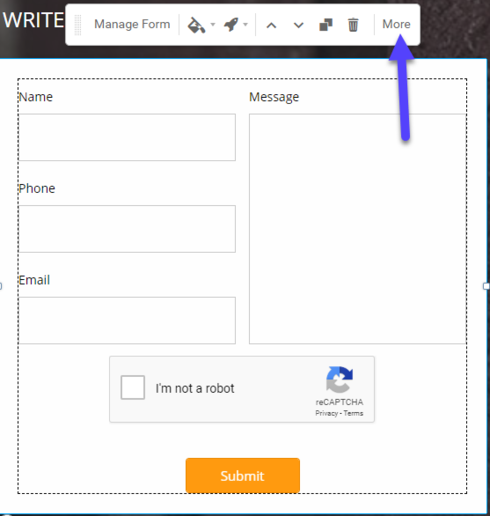
2) From the settings tool-bar, select the "More" option to expand the menu.
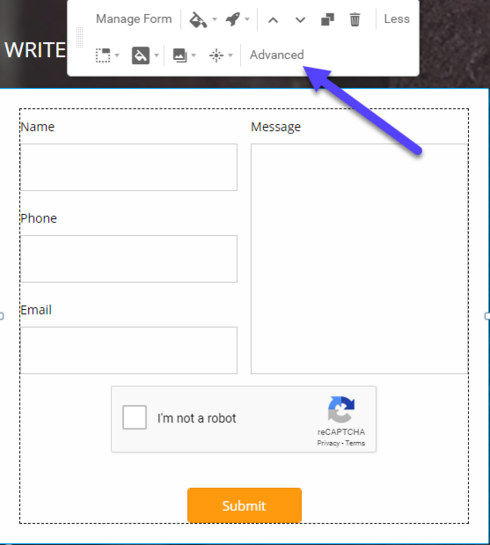
3) From the expanded Menu, Select "Advanced" to see the "Pop-Up Settings Menu" appear.
4) From the Pop-up settings menu at the top right-hand corner, select "settings."
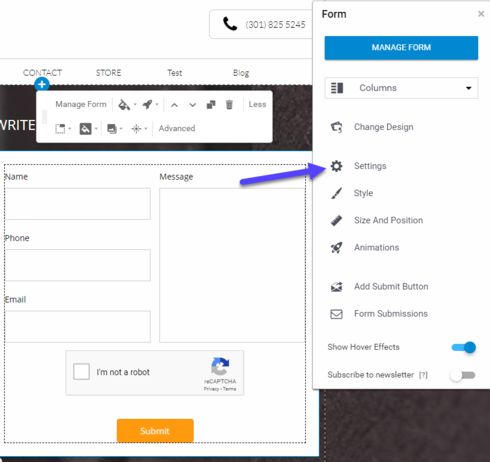
5) Enter your new email in the space provided. (Forwarded Addresses should be added from your email client's settings.)
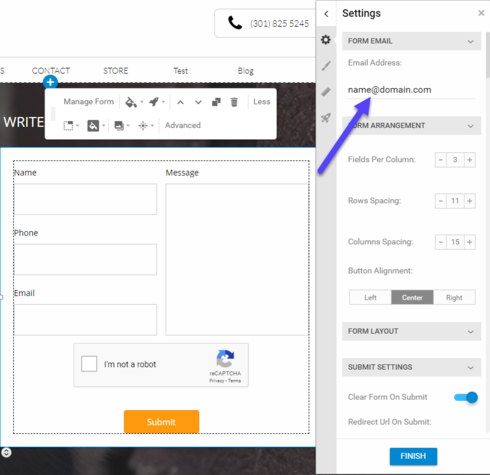
That's It. You should start receiving the email to the updated address as soon as you publish these changes.
Maybe you just upgraded your email to a domain-specific address and you'd like to change that on your contact form? Perfect, you're in the right place! Giving visitors an updated and accurate way to reach you means you're more likely to get the results you set out for! In this article, we will learn how to change your contact form email quickly and simply.
To begin,You will want to log into your Websitebuilder and navigate to the page that contains your contact form.
Pro Tip: If you are updating multiple forms with different fields, you will have to run through these steps separately for each form.
1) Physically click on the form to see its settings tool-bar appear directly above the form.
2) From the settings tool-bar, select the "More" option to expand the menu.
3) From the expanded Menu, Select "Advanced" to see the "Pop-Up Settings Menu" appear.
4) From the Pop-up settings menu at the top right-hand corner, select "settings."
5) Enter your new email in the space provided. (Forwarded Addresses should be added from your email client's settings.)
That's It. You should start receiving the email to the updated address as soon as you publish these changes.


gail4991
10 Messages
•
272 Points
7 years ago
6
0
larry5631
1 Message
•
130 Points
7 years ago
1
kevin6380
4 Messages
•
142 Points
7 years ago
6
0
keith9054
13 Messages
•
280 Points
6 years ago
Also the form isn't very easy to configure. Boxes for "short text" are the same size as those for "long text". It looks a bit unfriendly if all you're looking for is "number of persons"! Why not a "number" field with up and down arrows?
2
0
james9799
42 Messages
•
694 Points
3 years ago
Thank you!!!
0